Background
This article covers signing and notarization. Getting a 64-bit executable of your program is the job of whatever compiler or development environment you're using.
In macOS, applications are generally packaged up into bundles, which are folders containing the actual executable as well as additional resources and metadata. Signing a bundle means creating a cryptographic checksum of the bundle's content and then creating a cryptographic signature with a certificate that Apple issues to you. The signature is a statement from you personally guaranteeing that the application is well-behaved. If the contents of the bundle change, the checksum changes, and your signature will no longer match, warning the operating system that the bundle has been tampered with.
Signing has been in place for many years. More recently, applications also need to be notarized. Notarization means that you send your signed application to Apple, who then run additional checks and make a record of your application. If notarization succeeds, you "staple" the notarization to your application, so that offline machines without access to the Internet can still verify the notarization.
So it's all kind of a paperwork metaphor. You bundle together the bits that constitute your application. You make a list of all the things in your bundle (the checksum) and then you sign that list (the digital signature) and stick it to the bundle. Then, you give the signed bundle to Mr. Apple the notary, who checks over the bundle to make sure it's all good and then makes a record of it. He gives you a receipt which you then staple to the bundle. So now you've said that it's safe, and Mr. Apple has said it's safe, and so it's probably, hopefully safe. And if A Bad Person tinkers with the content, the list of things in the bundle doesn't match anymore, and you know not to use it.
Requirements
What you need to sign and notarize an app:
- A Mac recent enough to run Xcode 11, which means a Mac recent enough to run macOS 10.14.3. (So you don't need to install Catalina.) If you don't have Xcode installed yet, 25 GB of free space to run the install.
- If you don't have an Apple developer membership yet, an Apple ID login you want to use for the membership, and about $110.
Two-Factor Authentication
If you don't have it yet, enable two-factor authentication for your Apple ID. You can do this from your iDevice or from your Mac. On the Mac, go into iCloud control panel in System Preferences. There should be a panel at the top prompting you to enable 2FA.
Buy Membership
Log in to https://developer.apple.com/ with your Apple ID and go to the "Membership" tab. Buy or renew your Apple Developer Program membership if needed. Note that buying the membership takes a while to percolate through Apple's systems, so if you find yourself unable to generate the certificates (see below), have a cup of tea to calm yourself down.
App Identifier
You may have to register your app bundle ID with the developer backend. You can find your bundle ID by looking in YourApp.app/Contents/Info.plist . (You can open app bundles by right-clicking on them and choosing "Show Package Contents".) It should be something like com.yourcompanyname.applicationname, so for example Airships' is com.zarkonnen.airships.
To register the ID, log into https://developer.apple.com/, select "Certificates, IDs & Profiles" from the bar on the left, then select "Identifiers" on the next page. You can then press the "+" button to add your app's identifier.
App-Specific Password
You'll need an app-specific password to sign things from the command line, so go to https://appleid.apple.com/account/manage and generate one.
Xcode and Tools
Install Xcode through the Mac's App Store. Then, also install the Xcode command line tools from https://developer.apple.com/download/more . You want "Command Line Tools for Xcode 11" - or whatever the Xcode version is you're using.
Certificate
Launch Xcode, go into Preferences, go into the Accounts tab. Add your Apple ID to the accounts listed if needed. Then, click the "Manage Certificates..." button on the bottom right. This brings up the signing certificates you have. You need a "Developer ID Application" certificate, so create one if it's not listed. Click "Done" and then click "Download" in the Preferences:Accounts window to download the certificates locally.
Preparing the Application
For the application to work correctly under this new regime, make sure the executable and libraries are 64-bit compatible.
Also, Mac OS does a thing called "translocation" where it moves the location of the app bundle to a random location when it's running, for security reasons. In the case of my game, this manifested in it being unable to find the data files that were located next to the app bundle. It may be possible to obtain the original location of the app bundle, but I ended up solving this by just putting everything into the bundle.
Entitlements
These are specific permissions that you include with the code signature to allow the signed app to do certain things. Compiling with Xcode would let you handle this in there, but otherwise, you need to create a plist file containing the entitlements you need. You can create plist files with Xcode, and https://developer.apple.com/documentation/bundleresources/entitlements has a list of entitlements.
To create a new plist file with Xcode, choose "New File" and choose "Property List" from the list that comes up. Add items to the root dictionary with the names of the entitlements that you want, mapped to boolean:YES.
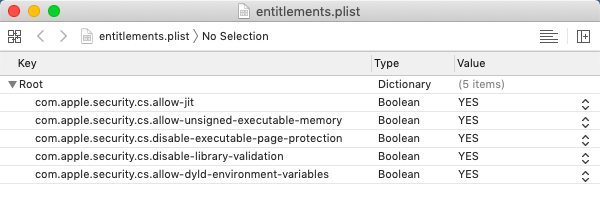
In the case of my game, because it runs on Java, I needed the following ones to get the JVM to work: com.apple.security.cs.allow-jit, com.apple.security.cs.allow-unsigned-executable-memory, com.apple.security.cs.disable-executable-page-protection, com.apple.security.cs.disable-library-validation, com.apple.security.cs.allow-dyld-environment-variables . Those are pretty scary-looking so I wouldn't put them in if you don't need them.
The info below assumes you put your entitlements into a file called entitlements.plist.
Signing
This creates a digital signature that states that someone with access to your signing certificate promises that this particular app bundle is A-OK and Not Evil. Changing anything at all about the app bundle (except stapling, see below) after signing invalidates the signature and requires re-signing the bundle.
This also means your application must not change anything about the contents of the app bundle while it's running, eg by putting a cache in there.
Each executable and dynamic library in the app bundle is signed individually. Depending on where you got your libraries from, they may already be signed. So the polite and gentle way of signing your bundle is to go over each one and signing it before finally signing the entire bundle. If there is a signature already in place for something, it will remain in place.
The impolite and effective way of doing it is to force deep sign it, which means that your signature gets applied to everything in the app bundle, replacing all pre-existing signatures. This is what we'll be doing, because it's easier, and because pre-existing signatures can be invalid or insufficiently strong.
Here is the dread invocation you need:
codesign -s "Developer ID Application: <YourName>" --timestamp --options runtime -f --entitlements entitlements.plist --deep YourApp.app
The --timestamp means that a valid timestamp is embedded with the signature, which is needed for notarization to succeed.
The --options runtime means that the signature enables the "hardened runtime", which is also needed for notarization to succeed.
You can inspect the signature created by invoking
codesign -d -vvvv YourApp.app
And you should also launch the app to make sure it still works when signed.
If you want to sign things the gentle way, omit -f and --deep and first sign all the executables and libraries inside the app and then the entire app.
Notarization
Now that you've signed your app, you also need to present it to Apple's systems for notarization, to say "hey look, I signed this thing".
To do this, first compress the app into a special zip using the ditto command like this:
/usr/bin/ditto -c -k --keepParent YourApp.app YourApp.zip
Just zipping it normally from the Finder or the command line will not work.
Them submit your zip for notarization like this:
xcrun altool --notarize-app --primary-bundle-id "<id>" -u "<appleid>" -p "<app-specific password>" --file YourApp.zip
Example:
xcrun altool --notarize-app --primary-bundle-id "com.zarkonnen.airships" -u "dave@hotmail.com" -p "bwnh-pbbt-llpt-xxxx" --file Airships.zip
You can find your bundle ID by looking in YourApp.app/Contents/Info.plist . (You can open app bundles by right-clicking on them and choosing "Show Package Contents".)
Notarization submission can take quite a long time. Usually a few seconds or minutes, but randomly like an hour. Make yourself more tea, or maybe a drink, depending. Eventually, it should return with something like this:
No errors uploading 'YourApp.zip'.
RequestUUID = 29926ae6-f551-4d54-b283-e29d6f9b9156
You can now use the following invocation to check the status of your submission:
xcrun altool --notarization-info <RequestUUID> -u -u "<appleid>" -p "<app-specific password>"
Example:
xcrun altool --notarization-info 29926ae6-f551-4d54-b283-e29d6f9b9156 -u "dave@hotmail.com" -p "bwnh-pbbt-llpt-xxxx"
This produces an output something like this:
          Date: 2019-10-08 06:59:58 +0000
          Hash: 0774fb95035408bacecebd64935a611ecd27b45ad9cbf3cc1aa48fa1e0eaa649
    LogFileURL: https://osxapps-ssl.itunes.apple.com/itunes-assets/Enigma123/...
        Status: success
   Status Code: 0
Status Message: Package Approved
Again, it usually takes maybe 15 minutes for approval, but sometimes it takes many hours for basically the same app. Yeah.
If the status is failure, look at the errors listed in the log file URL. If it's a success, still have a look, because you'll probably have warnings, and those warnings may well become errors when Apple further tightens their requirements.
Stapling
Finally, you "staple" the notarization approval to your app bundle, which is meant to allow a Mac without an Internet connection to still verify notarization. To do this, invoke this surprisingly short command:
xcrun stapler staple "YourApp.app"
Congratulations. You now have a signed and notarized Mac application. You can now distribute that app bundle however you choose, as long as you don't modify it in the process.
Java
If you happen to be in the same boat as me and need to bundle a JVM with your app, read on.
There's a few options for bundling a JVM with a Java application. The one I'd recommend is AppBundler, which is an ant task that does it for you. AppBundler was originally available on java.net, but thanks to Oracle's fine work in neglecting the wider Java platform, you now want to go to https://github.com/TheInfiniteKind/appbundler where you can find an up to date version.
Well, you can find the source and documentation, but not the jar, because the assumption is you're using Maven. If you're not using Maven, you can find the jar here: https://jar-download.com/artifacts/com.panayotis/appbundler
Follow the docs on the github page to set up the bundling. In my case, I'm using NetBeans, and so I inserted the following into build.xml to do the right thing:
<target name="-post-jar">
  <taskdef name="bundleapp"
    classpath="lib/appbundler-1.1.0.jar"
    classname="com.oracle.appbundler.AppBundlerTask"/>
  <bundleapp
      jvmrequired="1.7"
      outputdirectory="/home/zar/Desktop"
      name="Airships"
      displayname="Airships"
      executableName="Airships"
      identifier="com.zarkonnen.airships"
      shortversion="1"
      version="1"
      mainclassname="com.zarkonnen.airships.Main"
      copyright="2019 David Stark"
      applicationCategory="public.app-category.games">
      <classpath dir="dist"/>
      <runtime dir="/home/zar/Desktop/jdk-11.0.4.jdk/Contents/Home"/>
      <arch name="x86_64"/>
      <option value="-Dapple.laf.useScreenMenuBar=true"/>
      <option value="-Dcom.apple.macos.use-file-dialog-packages=true"/>
      <option value="-Dcom.apple.macos.useScreenMenuBar=true"/>
      <option value="-Dcom.apple.mrj.application.apple.menu.about.name=Airships"/>
      <option value="-Xdock:name=Airships"/>
      <option value="-Dcom.apple.smallTabs=true"/>
      <option value="-Dfile.encoding=UTF-8"/>
      <option value="-Xmx1024M" name="Xmx"/>
  </bundleapp>
</target>
This is a task that runs after the jar file is created. It uses appbundler-1.1.0.jar to create an app bundle with a JVM embedded.
You can get the JDK I'm using from https://www.oracle.com/technetwork/java/javase/downloads/jdk11-downloads-5066655.html . I picked version 11 because it's LTS (long-term support) but uses the old Oracle licence terms, whereas version 13 has a weird new set of licence restrictions.
There's also more legally unencumbered JVMs from OpenJDK but I was unable to get them to work with app bundler.
Quick note: a JVM is a "Java Virtual Machine". The JRE is the "Java Runtime Environment", which includes a JVM plus some bits and pieces like the Java updater. The JDK is the "Java Development Kit", which is the JRE plus the stuff you need to actually write Java programs, like the compiler. Until Java 8, the JRE was available separately for end users, but since then, the JDK is the only one available, which is why we're bundling a Java dev environment with a computer game.
You should be able to deep sign and notarize the resulting bundle. Consult the documentation of AppBundler for a whole bunch of additional options, such as how to give it a proper icon, associate file types, and generate a cut-down JVM for your application.
Further Reading
- Tips And Tricks for Shipping a PyGame App on the Mac - Some things specific to Python packaging, and also includes a section on signing and notarization.
- Apple's Developer Page on Gatekeeper
- Notarizing your Flash/AIR applications for macOS - Another article on signing and notarizing, with additional information specific to Flash/AIR.
- Apple's temporary relaxation of notarization rules
Addenda
- Reddit user AMemoryOfEternity asked on the Steam developer forums, and notarization is currently not required for Steam apps after all. They do need to be 64-bit, and it's unclear whether they need to be signed. link, requires Steamworks access
- Apple has temporarily relaxed the rules for notarization, so in the short term you can get away with notarizing apps that don't have the hardened runtime, that have subcomponents not signed by your developer ID, that don't have secure timestamps, etc. These things will still show up as warnings in the notarization report, and it's certainly good future-proofing to eliminate the warnings now if you can.
- According to Valve, you need to grant the com.apple.security.cs.allow-dyld-environment-variables entitlement for the Steam API to work: "Steam injects the API dylib through DYLD_INSERT_LIBRARIES, which is blocked by the hardened runtime by default, but the API dylib itself is signed and should pass validation, so it should just need the "com.apple.security.cs.allow-dyld-environment-variables" entitlement to allow the DYLD environment variables to be set."
- I have now automated code signing for my game using a shell script that calls another shell script via SSH on a Macbook. But I've noticed that if I let the Macbook lock its screen, progress seems to stall? It may be that SSH sessions into accounts that have a locked screen can't proceed? My partner's comment on this: "You fucked up a perfectly good Unix is what you did. Look at it. It's got anxiety."